ChatGPT + Serverless Framework: Streamlining Cloud App Development

August 11, 2023

My go-to method for initiating a new personal project is an innovative combination of the Serverless Framework[1] and ChatGPT. This powerful blend enables me to describe my project requirements using natural language and quickly receive a stack of resources necessary for my web application.

For example, all I had to say was:

“Give me a Serverless Framework YAML file to create an API endpoint to get/put an item in a DynamoDB using a Python-based Lambda.”

This wasn’t just a command; it was a powerful instruction that resulted in the following output:

1
2
3
4
5
6
7
8
9
10
11
12
13
14
15
16
17
18
19
20
21
22
23
24
25
26
27
28
29
30
31
32
33
34
35
36
37
38
39
40
41
42
43
44
45
service: my-dynamodb-service

provider:
name: aws
runtime: python3.8
region: us-east-1
iamRoleStatements:
- Effect: Allow
Action:
- dynamodb:GetItem
- dynamodb:PutItem
Resource: "arn:aws:dynamodb:${opt:region, self:provider.region}:*:table/MyTable"

functions:
getItem:
handler: handler.getItem
events:
- http:
path: item/{id}
method: get
cors: true

putItem:
handler: handler.putItem
events:
- http:
path: item
method: put
cors: true

resources:
Resources:
MyTable:
Type: AWS::DynamoDB::Table
Properties:
TableName: MyTable
AttributeDefinitions:
- AttributeName: id
AttributeType: S
KeySchema:
- AttributeName: id
KeyType: HASH
ProvisionedThroughput:
ReadCapacityUnits: 5
WriteCapacityUnits: 5

Thrilled with the result, I asked again:

“Give me the Python handler file and instructions to deploy this.”

The response was equally prompt and effective:

Create Python Handlers

Create two Python functions in a file named handler.py. These functions will correspond to the getItem and putItem Lambda functions defined in the YAML file.

1
2
3
4
5
6
7
8
9
10
11
12
13
14
15
16
17
18
19
20
21
22
import boto3
import json

# DynamoDB client
dynamodb = boto3.resource('dynamodb')
table = dynamodb.Table('MyTable')

def getItem(event, context):
item_id = event['pathParameters']['id']
response = table.get_item(Key={'id': item_id})
return {
'statusCode': 200,
'body': json.dumps(response['Item'])
}

def putItem(event, context):
item = json.loads(event['body'])
table.put_item(Item=item)
return {
'statusCode': 200,
'body': json.dumps({'message': 'Item inserted successfully'})
}

Directory Structure

Ensure that your directory structure looks like this:

1
2
3
project-root/
|-- handler.py
|-- serverless.yml (your YAML configuration)

Deploying the Service

Navigate to your project root directory and run the following command:

1
serverless deploy

This command packages and deploys your service, including the Lambda functions and the DynamoDB table.

The collaboration between the Serverless Framework and ChatGPT simplifies the development process, converting ideas into ready-to-deploy code with ease. It’s a practical change in how I tackle personal projects, aligning innovative thinking with contemporary cloud tools.

[1]: Serverless Framework: https://www.serverless.com/
AWS CDK workshop troubleshooting notes

CDK is a new way to manage infrastructure as code(IaC). It looked interesting but I never got to work with CDK much. I recently swithced my roles to become a software engineer at Amazon and we heavily use CDK for our CI/CD pipelines. So I need to practice and get better at using CDK. While doing this CDK pipeline workshop(link below), I ran into a bunch of issues. Here are my troubleshooting notes.

https://cdkworkshop.com/20-typescript/70-advanced-topics/200-pipelines

Issue 1: This CDK CLI is not compatible with the CDK library used by your application. Please upgrade the CLI to the latest version. (Cloud assembly schema version mismatch: Maximum schema version supported is 8.0.0, but found 9.0.0)

Uninstall the CDK version:

npm uninstall -g aws-cdk

Install specfic version which your application is using. For ex: CDK 1.158.0

npm install -g aws-cdk@1.158.0

Reference: https://stackoverflow.com/questions/66565550/how-to-solve-cdk-cli-version-mismatch


Issue 2: When trying to push code to codecommit you get this error error: src refspec main does not match any

Check the local branch name. If you’re trying to push to the main remote branch and your local branch is master you’ll run in to this error. Fix this by renaming the local branch to main and push to remote after that.

git master -m main
git push


Issue 3: TS2304: Cannot find blob

add the dom entry to the lib in tsconfig.json. Your tsconfig file should look like this

1
2
3
4
5
6
7
8
9
10
11
12
13
14
15
{
"compilerOptions": {
"target":"ES2020",
"module": "commonjs",
"lib": ["es2020", "dom"],
"outDir": "dist",
"resolveJsonModule": true,
},
"exclude": [
"coverage",
"node_modules",
"dist",
"tests"
]
}

Reference: https://stackoverflow.com/a/66275649

Tag Inheritance - A valuable CloudFormation feature

October 31, 2020

Tagging is a crucial aspect of Management and Governance of AWS Accounts of any individual or organization.

Here are some advantages of tagging your AWS resources:

  1. Organize AWS resources - Filter all resources with a particular tag
  2. Use tags for Cost Allocation - what Application costs the most?
  3. Use tags for automation - opt/in out your ec2 instances to stop in evenings/weekends
  4. Use tags for Access Control - Restrict EC2 API calls in resources tagged as Production

I got these four advantages from an AWS Documentation page. Click here to read more.

Now we have established that tagging is useful. Let’s look at how Cloudformation allows Tag Inheritance to simplify the tagging of resources in a stack.

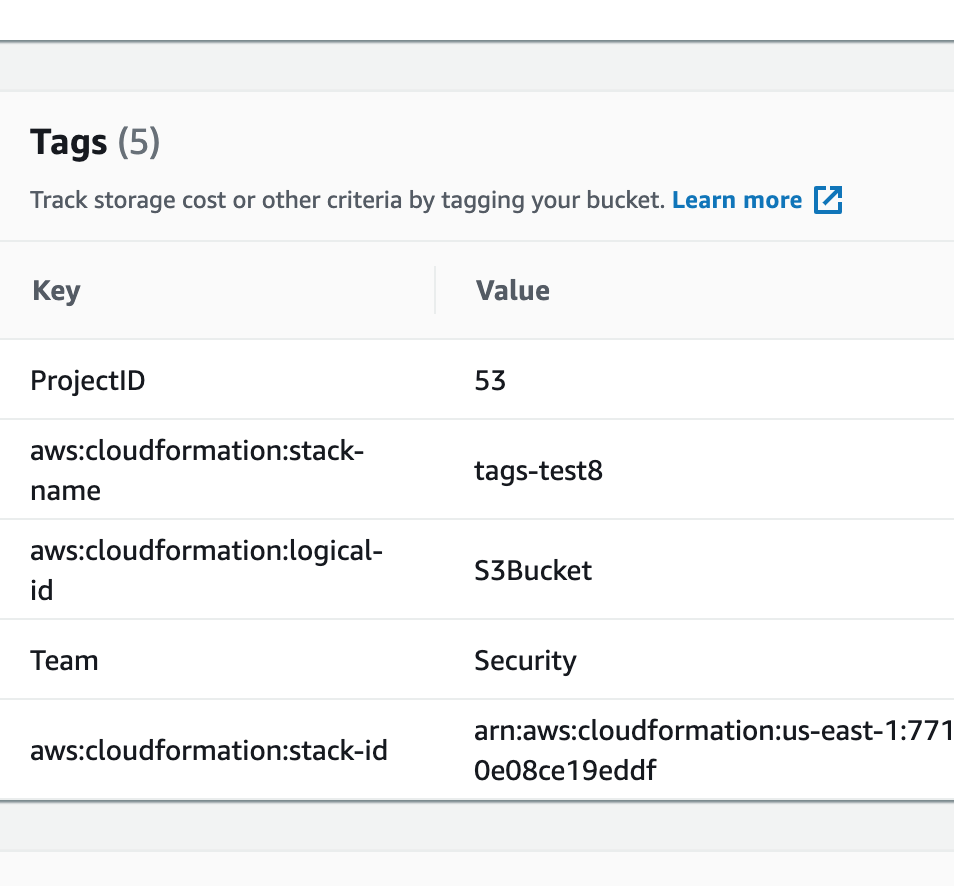
In addition to any tags you define for an individual resource, AWS CloudFormation automatically creates the following stack-level tags with the prefix aws: :

  • aws:cloudformation:logical-id
  • aws:cloudformation:stack-id
  • aws:cloudformation:stack-name

All stack-level tags, including automatically created tags, are propagated to resources that AWS CloudFormation supports.

Reference:
https://docs.aws.amazon.com/AWSCloudFormation/latest/UserGuide/aws-properties-resource-tags.html

This feature makes tagging all your resources extremely simple when using Cloudformation to provision resources. Apply tags once at the stack level, and all the tags propagate to the supported Stack resources.

Let’s test this out!

Lab Template( Also available as a separate file on this folder). This template will only work in the US-east-1 region due to hardcoded AMI value

1
2
3
4
5
6
7
8
9
10
11
12
13
14
15
16
17
18
19
20
21
22
23
24
25
---
AWSTemplateFormatVersion: "2010-09-09"
Description: Create multiple AWS resources to test Cloudformation Tags propagation.

Resources:
SimpleInstance:
Type: AWS::EC2::Instance

Properties:
InstanceType: t2.micro
ImageId: ami-8c1be5f6

SimpleInstance1:
Type: AWS::EC2::Instance

Properties:
InstanceType: t2.micro
ImageId: ami-8c1be5f6

S3Bucket:
Type: AWS::S3::Bucket
Properties:
AccessControl: Private


2 Methods of deploying this template:

  1. You can use this template and add tags to the Cloudformation Stack from the AWS Management Console.
    OR
  2. You can use the AWS CLI.

Steps:

  • Download the template above ( also available as a separate file on this folder)

  • We will use AWS CLI way of adding tags to the Stack and verify the propagation of the tag to the individual resources. Make sure the template file name in the CLI command matches the Cloudformation template file name.

aws cloudformation create-stack --stack-name cfn-tags-test --template-body file://tags-test-multiple-resource.yaml --tags Key=ProjectID,Value=53 Key=Team,Value=Security


You can verify if Cloudformation propagated tags to each resource by using the AWS Management Console. This image below shows how the tags section looked for the S3 bucket created with the above CloudFormation template.

AWS Console Screenshot

Cleanup:
Make sure you delete your CloudFormation Stack to stop incurring charges.

aws cloudformation delete-stack --stack-name cfn-tags-test

Let me know if you have any questions.

CloudFormation and Soccer connection

October 31, 2020

I’m a soccer fan. When I first heard about CloudFormation this image was something that came to my mind.

After learning a few intermediate CloudFormation components like parameters and mappings and custom resources, this is how I think of CloudFormation now.

Some analogies between CloudFormation and Soccer:

  • In Soccer, to play a game, all you need is a ball. Similarly in Cloudformation, to launch a stack, the only section required in a template is a resources section with at least 1 resource.

  • Stack updates are like player substitution( or even a ball substitution) in a professional Soccer game

  • CloudFormation has certain limits just like a professional soccer game. The new per template limits for the maximum number of resources is 500 (previously 200), parameters is 200 (previously 60), mappings is 200 (previously 100), and outputs is 200 (previously 60). This is similar to max numbers of players in a soccer game ( 11 per side), max number of substitute on bench( 7), max allowed substitution per game (3).

I’ll add more analogies in the future when they come to me. If you have any suggestions, let me know in the comments.

By the way, you can read about the new limits for Cloudformation here which lets you work with more resources/parameters/outputs per template.

Hello Cloud World

This is my Cloud blog. Hello Cloud World!